通讯方式
组件就像是一个个的零件,我们需要按照 Angular 定义的规则将它们组装起来,而且它们之间可以进行交流通讯,这样才组成一个有机的完整系统。
在一个完整的系统中,组件会形成树形结构,如下图所示。
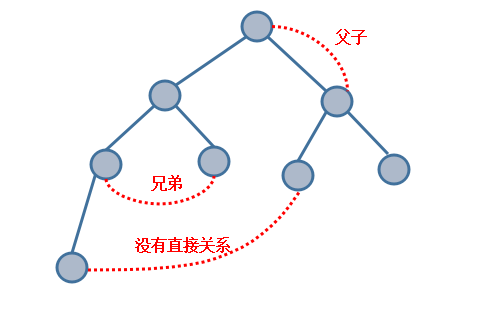
Angular 组件间的典型通讯方式有以下几种:
- 直接的父子关系:父组件访问子组件的
public属性和方法- 直接的父子关系:子组件借助于
Input和Output和父组件进行通讯- 没有直接关系:借助于
service单例进行通讯- 利用浏览器的
cookie和localStorage存储进行通讯- 利用
session进行通讯
直接调用
对于组件间的关系是父子关系,父组件可以直接访问子组件里面的 public 方法和属性。其父组件代码如下
parent.component.html
1 | <app-child #child></app-child> |
通过在模板里面定义局部变量的方式来直接调用子组件里面的 public 型方法,该段代码表达的意思是父组件中点击 调用子组件方法 按钮,调用 child 中的 public 方法 childFn()。而子组件代码如下
child.component.ts
1 | public childFn():void{ //public可以要,可以不用, |
运行该项目,在浏览器中,点击 调用子组件方法 按钮,按 f12 查看控制台,可以看到输出 点击事件发生在父组件
该方式是在组件的模板 parent.compontent.html 中调用子组件,如果需要在父组件本身 parent.compontent.ts 中调用子组件,在父组件中需要引入 ViewChild 装饰器,代码如下所示
parent.component.ts
1 | import { ViewChild } from '@angular/core'; |
在父组件的ts文件中,child 代表的是子组件,这样就可以调用子组件的 public 方法或属性,关于 @viewChild 装饰器以后会详细介绍。
@Input 和 @Output
@Input 和 @Output 是 Angular 提供的装饰器,子组件和父组件之间的通讯可以用到这两个装饰器,并且在 Angular 项目的 通用组件(即将多处相似的模板提取出来,重写成一个组件,这个组件在项目中多处被使用) 中经常被使用。
@Input
@Input 装饰器是子组件获取父组件的属性,代码如下所示
parent.component.html(父组件模板)
1 | <app-child comVar="父组件模板变量"></app-child> |
child.component.ts(子组件)
1 | import { OnInit, Input } from '@angular/core'; |
可以在浏览器控制台中看到输出 父组件模板变量
上面的变量是在模板中定义,也可以采用 Angular 的属性绑定机制,在父组件 parent.component.ts 中定义数据,在模板 parent.component.html 中使用,代码如下所示
parent.component.ts
1 | ..... //代码块 |
parent.component.html
1 | <app-child [varParent]="comVar"></app-child> |
其子组件代码如下所示
child.component.ts
1 | import { OnInit, Input } from '@angular/core'; |
可以在浏览器的控制台中看到输出 父组件变量
@Output
@Output 的本质是事件机制,我们用它来监听子组件中的事件,即子组件发生了某个事件,通知父组件,代码如下所示
child.component.ts
1 | import { EventEmitter, Output } from '@angular/core'; |
child.component.html
1 | <button (click)="doEmit()" class="btn btn-success">派发事件</button> |
其父组件代码如下所示
parent.component.html
1 | <!-- event对应的是子组件中 new EventEmitter() --> |
parent.component.ts
1 | .... //代码块 |
在浏览器中,点击子组件的 派发事件 按钮,可以在控制台看到输出 子组件字符串 ,并且每点击一次,其父组件就会在控制台输出一次。
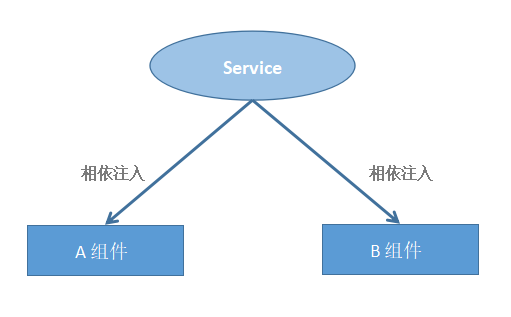
Service
服务(Angular6 版本)通讯模式如下图所示
Service优点
很明显,上述两种 直接调用 和 Input 和 Output 组件间的通讯方式有一定的局限,即组件间的关系必须是父组件和子组件。在完整 Angular 项目中,组件与组件之间可能不存在直接关系,但组件之间需要进行通讯,这时就需要使用 Angular 提供的 service 功能,使用 service ,在同一个项目中,各个组件之间都可以进行通讯。
版本区别
在 Angular6 版本以前,Angular 的服务(service)采用的是 依赖注入 方式,而 Angular6 版本采用的是 相依注入 方式。
依赖注入(Angular5)
由于依赖注入存在于 Angular6 版本以前,而且 Angular7 版本也出来不久,一般开发项目都是采用最新技术,所以关于 依赖注入 可以了解一下,看其使用机制。代码如下所示
定义一个服务 CommunicateService
communicate.service.ts
1 | import { Injectable } from '@angular/core'; |
在组件中使用该服务需要在组件所在模块中配置注入器(也可以在组件中配置),其代码如下所示
app.module.ts
1 | import { CommunicateService } from './communicate.service'; |
在A组件中,使用该服务(service)
A.component.ts
1 | import { CommunicateService } from '../communicate.service'; |
A组件模板代码如下所示
A.component.html
1 | <button (click)="setEventBus()" class="btn btn-success">点击</button> |
在B组件中,使用该服务(service)
B.component.ts
1 | import { CommunicateService } from '../communicate.service'; |
点击A组件模板中的 点击 按钮,可以在控制台输出 触发service ,而且这是由B组件输出A组件中定义的值,即实现了通讯。
相依注入(Angular6)
在 Angular6 版本中,对于 Service ,框架采用了相依注入的模式。即在 Angular5 版本中的配置注入器由框架自动完成。其代码如下所示
communicate.service.ts
1 | import { Injectable } from '@angular/core'; |
在上述代码中,provideIn 为 root,即在项目中各个组件都可以使用该服务,若只想在某个模块中使用该服务,在服务中引入模块名,将代码中的 root 改成 模块名 即可。
在A组件中,使用该服务(service)
A.component.ts
1 | import { CommunicateService } from '../communicate.service'; |
A组件模板代码如下所示
A.component.html
1 | <button (click)="setEventBus()" class="btn btn-success">点击</button> |
在B组件中,使用该服务(service)
B.component.ts
1 | import { CommunicateService } from '../communicate.service'; |
点击 A组件 模板中的 点击 按钮,可以在控制台输出 触发service ,而且这是由 B组件 输出 A组件 中定义的值,即实现了通讯。
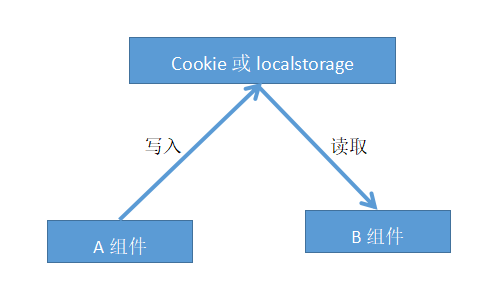
cookie 或 localstorage
组件与组件间的通讯也可以使用浏览器的自带功能,即 cookie 或 localstorage,其模式如下图所示。
在A组件中写入 cookie 或 localstorage 代码如下所示
A.component.ts
1 |
|
A模板代码如下所示
A.component.html
1 | <button (click)="setLocal()" class="btn btn-success">设置localstorage</button> |
在B组件中获取 cookie 或 localstorage 代码如下所示
B.component.ts
1 | private conLocal():void{ |
B组件模板代码如下所示
B.component.html
1 | <button (click)="conLocal()" class="btn btn-success">输出localstorage</button> |
在浏览器中,点击A组件中 设置localstorage 按钮,然后点击B组件中 输出localstorage 按钮,可以在控制台输出A组件中设置的 json 对象,即采用 cookie 或 localstorage 的通讯方式成功。
Session
利用session在组件间的通讯模式如下图所示

Session :在计算机中,尤其是在网络应用中,称为“会话控制”。Session 对象存储特定用户会话所需的属性及配置信息。这样,当用户在应用程序的 Web 页之间跳转时,存储在 Session 对象中的变量将不会丢失,而是在整个用户会话中一直存在下去。